How To Blend Colored Pencils In Different Ways
Personally, I believe in standing alone on my own rather than trying hard to blend in with the rest of the crowd like a chameleon!
But when it comes to coloring, I must say, blending is truly something that you should learn how to do properly.
Combining different colors not only allows you to add a subtle softness to your work but also, it gives your drawing a cleaner, more polished look and adds a delicate richness to the overall picture.
While the art of blending may seem all nice and effortless, don’t get fooled by its appearance my friend!
Think a simple swipe of the finger over the colors will do the trick?
Think again!
To achieve a smooth transition in work and give your art the exact texture and richness you are looking for, there are certain rules and techniques that you must follow.
Interested in learning how to blend colored pencils in different methods and get an AWESOME effect on your next project?
Well, grab a color book and stay tuned until the end of this article!
Table of Contents
How Is Pencil Blending Different From Other Mediums?

If you have worked with watercolor before, then you must be familiar with how easy it is to fuse those colors together!
You just have to pick one color, dip your brush into water and mix another color on top of it. Voila!
The shades will automatically begin to come together just like that!
The blending technique for pastel is even easier!
You can smear the paintings with a soft-bristled brush or even by your bare hands and it’s done! The same goes for charcoal drawing as well.
However, when it comes to colored pencils, things aren’t that simple!
You see, unlike water-based or powdery mediums, colored pencils are made of either wax or oil-like ingredients and therefore, stick to the surface very well.
Although this characteristic allows this equipment to produce a mess-free, pigmented look to your drawing, it also makes it more difficult for the colors to intermingle with each other in a smooth transition.
Don’t worry! We aren’t going to leave you out of the loop here!
It’s still possible to achieve the sophisticated look you are aiming for by smoothing out the rough hues and eliminating the sharp strokes of your painting quite easily.
But you will need to gather some tools first!
Let’s take a look.
Tools That You Need For Blending Colored Pencils

1. Good Quality Drawing Paper
There’s paper for every kind of drawing.
And you have to figure out which one works best for you!
However, there are a few things to be noted. For instance, it’s better to avoid those cheaper ones made of wood-pulp materials. As colored pencils are fairly pigmented, chances are, the paper might under the pressure or result in poor presentation.
Go for some quality drawing paper that can handle any thick, waxy stroke you throw at it like a champ!
Also, it's best to opt for a paper that comes with a hot press finish that‘s smooth enough to allow you to draw fine details, yet grabs pigmented colors pretty well.
2. Coloring Pencils From Different Brands
Surprised?
Well, it’s a little trick that I picked up along the way and thought of sharing this with you!
Although all brands claim to produce the same shades under the same common names, there’s a slight difference to each one of them.
So, before trying out with our blending techniques, you should gather the same shades from different brands so that you can experiment and decide on which one works best for you.
Also, a side-tip would be to choose wax-based pencil over others for a smooth ride along the way!
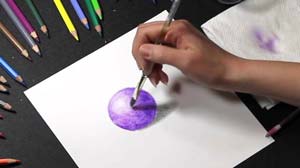
3. Solvents
The magical potion that breaks the binders of any wax- or oil-based material!
And you know what happens when the binders get loose?
The pigments start to flow on top of each other and create almost like a paint effect. How cool is that?
Depending on how you want the layers to blend in with each other and to what extent, you can use varied ranges of solvents from mild ones like baby oil or Vaseline to the most aggressive ones like rubbing alcohol. Here we discussed about two common solvents that you can use.
4. Paper Towel
If it’s a little smudge, a little something to smooth out the blemishes you are looking for, then you can try using paper as an alternative to chemicals here.
To blend out the rough lines and strokes, you can use any kind of paper product that’s available near you. For instance, a tissue paper, soft fabric or even a toilet paper would suffice!
5. Colorless Blender Pencil
It’s basically a wax-based pencil that has no color!
If you don’t want to blend all over the surface, then this one is a must-have item for you.
Colorless blender pencil lets you select a particular spot and put more wax on top of it. As a result, the texture gets a bit mushy and becomes easily blend-able.
6. Colorless Solvent Marker
It basically works almost like a blender pencil except it creates a watercolor-like effect on the surface.
The tip of the marker is laced with alcohol. Whenever you touch the tip to a particular spot, it helps dissolve the binders and allow the colors to get mixed up with each other in a smooth motion.
You don’t need to collect all of the items right away!
Just pick the one that suits your preference and get started with one of the techniques mentioned down below!
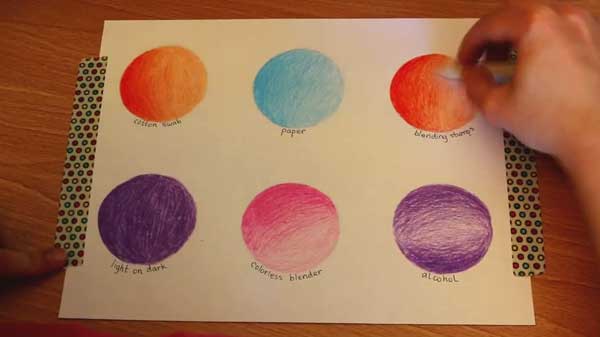
Different Ways You Can Blend Colored Pencils: Beginners Guide

1. Overlay Different Colors
You can use a single color or several different colors for this purpose.
2. Smudge With A Paper Towel
This method is also called dry blending.
3. Use A Colorless Blender Pencil
You can use this method if you want to blend any small particular spot.
4. Blend Colors Using Rubbing Alcohol
This technique is quite aggressive. So, only use it if the above two methods don’t work for you.
5. Apply Baby Oil To The Surface
This is by far the most popular choice as it hardly results in any color loss.
6. Petroleum Jelly/Vaseline
Vaseline helps brighten up your drawing and make them look more saturated.
7. Blend With Colorless Solvent Marker
These are just your regular markers with no color! However, you can’t use it to mix up two different colors. This marker is only good for blending the same shade.
8. Use Nail Polish Remover
Yep! You can use a nail polish remover for this purpose!
However, the main ingredient that's in nail polish is called "Acetone" and it has a distinct smell. So, it's best to work on your project in a well-ventilated area in this case.
Remember These Tips And Tricks!
Wrapping It Up
Did you know our eyes can detect over 7,000,000 different colors?
Bet you don’t have that many colors in your collection, do you?
Well, that’s where blending techniques come into play!
By combining different colors and mixing them up, you can create any unique colors that you want without spending extra money on it!
Hopefully, our guideline on how to blend colored pencils in different ways has helped you to add lifelike detail to your artwork, capture the beauty of ordinary objects through the right shade you create and turn it into something extraordinary!

