Mug Decorating Ideas: 20 Simple And Unique Project
Stressing over what to give your loved ones as a gift for this holiday season?
While receiving gifts is something everyone enjoys, there’s something special about preparing a surprise for someone you want to make happy as well!
However, selecting a particular gift for a loved one is a real struggle, I must say!
Should you buy something expensive?
“But you don’t have enough cash for it!”
Perhaps it’s best to purchase a clothing item?
“You never know if it’s going to fit or not!”
We are putting an end to this dilemma by presenting you with some cool, innovative ways to surprise your friends and family this season!
Meet our mug decorating ideas, which are inexpensive, easy to prepare, comes in a size that fits everyone and most of them take little to no skill at all!
Not to mention, the person at the receiving end will be able to use it daily while admiring your handiwork at the same time.
Interested?
Let’s get you started with all the things you need for this craft right away!
Table of Contents
Things You Need To Decorate Mugs
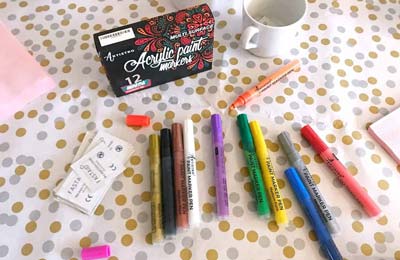
Mugs
This one is so obvious!
However, while selecting your mug, we recommend purchasing non-glazed ceramic or porcelain mugs for this purpose. The thinner the glaze is on the outside, the easier it is for sharpies to penetrate the surface and leave its mark on it.
Rubbing Alcohol And Cotton Balls
Did you know the paint that you are going to draw with is not going to stick very well if the mug is dirty?
So, before starting your project, wipe off all the dirt and debris from the mug by applying rubbing alcohol on the surface with the help of a cotton ball. You can also use these cotton balls for erasing mistakes while painting quite easily.
Sharpies
Gather as many sharpies as you can!
Be it Black, Red, Orange or any other color of your preference, you can draw all sorts of designs on your mug with this inexpensive tool.
One point to be noted, you can't use regular sharpies for most of these ideas as they won't set on the surface properly. Instead, use the oil-based sharpies for this purpose.
Paint
Another way to decorate your craft with colors is to use Acrylic paint on it!
You will find a lot of variations while shopping for acrylic paint in the market. Read the instruction carefully and pick the one that’s meant to be used on unglazed ceramic materials for your project.
Also, if you are going to work with acrylics, then you better purchase a sealant that needs to be applied afterward to cure the mugs properly. Use good quality acrylic paint brushes for making shape on your mug. A good brush will help you to create perfect shape that you want.
Glue
You should choose good-quality adhesive, especially if you are trying to make a photo printed mugs for any occasion.
The glue that you use should have a thick, clear consistency that sticks well to paper or ceramics and dries quickly.
We suggest using the Mod Podge for this purpose as this glue also works as a sealant to protect the acrylic paint as an added bonus.
Oven
Surprised?
If you thought oven is just for baking pie or Nutella-stuffed muffins, then wait till you get to read some of our awesome ideas which include baking the mugs in the oven to make the designs permanent on it!
Photo Editing Application
You won’t need it all the time, but its best to download a photo editing app on your computer in case you need to resize a template that you just downloaded to make it a stencil for decorating your mug.
Also, it will come in handy if you are planning to make a photo printed mug and decorate it with one of your family photos that need to be retouched or resized a little bit.
Painter Tape
The easiest way to create beautiful patterns on mugs is to tape off some places and paint over it!
Not only it’s super easy and fun to work like this, but also, you might get surprised with the end result as that comes off as pretty cool!
You can also use this tape to mask the rim of the glass so that the paint doesn't get to the place from where you will be drinking and get mixed with your hot beverage!
Pencil
Not confident enough to get the perfect design on your first try?
We totally get it!
That’s why it’s always a better idea to draw the outline of the design with a graphite pencil first. You should use a soft pencil, charcoal pencil either HB or 2B for this purpose.
Brushes
As much as I love to play with colors with my bare hands, brushes are a pretty good alternative, I must say!
If you want to add details on your work, then use fine-tipped brushes. In case, you want to fill in a large space, you can go for thicker ones.
Depending on your work and strokes, you will be needing a set of brushes with different thicknesses for this crafting project.
20 Unique Mug Decorating Ideas
1. Remember The Good Old Days
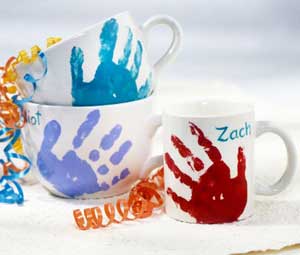
Handprinted mugs are an adorable way of keeping your little one’s signature alive on a coffee mug long after they grow up!
And the best part is the kids will have a blast preparing these awesome mugs as a gift for the upcoming Father’s Day as well!
You only need an enamel paint and a surface conditioner for this purpose. To prime the outside of the mug, first, apply a generous amount of surface conditioner and wait for a few minutes to let it dry.
Now comes the fun part.
Ask your kid to smear their hands with paint as much as they want!
After painting the entire palm, place his hand on the mug and keep it still until a complete handprint is left on the surface.
Don’t forget to wash your kid’s painted hand once you are done before they ruin your clothes!
2. Bake A Mug!

Apart from baking a yummy cheesecake, your oven is capable of helping you with your crafting projects as well!
Want to decorate your cup in the least expensive way?
Well, a cool DIY mug is only one sharpie away from you!
Just use a black or a colorful sharpie to draw any random pattern or write what comes to your mind. Then, put the mug in the oven and let it bake for 30 minutes at 350-Degrees.
Once the timer goes “Ding”, pull out the cup from the oven, let it cool and enjoy a brand-new mug for drinking tea or coffee with some cool lines written along the surface!
One point to be noted, this method isn’t dishwasher-safe. You have to fix up the designs every time you choose any other cleansing methods other than handwashing.
3. Draw Oversized Floral Pattern

Flowers, be it real or hand-drawn, always add an extra-warmth to where it belongs!
If you want to add a splash of color to your regular coffee mugs, then we suggest drawing large flower patterns in your desired ceramic color on the surface.
Don’t be afraid to go over the edge while drawing those huge flower petals and leaves! That’s exactly what we want!
Let the paint dry on its own. For the final touches, draw an outline of the leaves and stamens of the flowers with a marker and add any fine details you want to make the art look more realistic!
As for the paint marker, an oil-based pen in Black color would be appropriate for this scenario.
Want this design to stay permanent on your cup?
Follow the direction of your ceramic paint and put the cup in the oven to get a beautifully cured mug forever!
4. Marvel At The Marbled Beauties

You have to be as quick as a flash to achieve this particular look.
The idea is to create marble-like swirl patterns on the mugs that are going to set your cup apart from others. And we are going to get this job done using a supply you probably have at your home, which is nail polish!
Fill a wide container with warm water and start dripping a little amount of polish into it. Then, break up any cluster that might be in the liquid with the help of a toothpick or a disposable skewer.
Once you can see the swirling lines of nail polish across the water, slowly dip your mug while avoiding the rim as much as possible.
Lift your mug to see the beautiful pattern that’s been created on the surface!
The trick is to work super quickly, otherwise, the chemical of the nail polish will get clumpy and unusable.
5. The Fallen Leaves Of Autumn
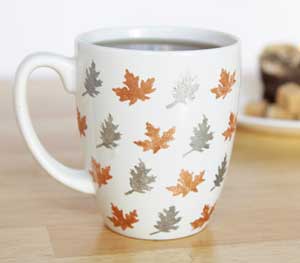
Autumn is the time when nature decides to treat us with its red, crimson, orange and golden leaves!
Want to pick some of these beautiful leaves and decorate your cups with them?
Don’t worry! We won’t ask for much of your time for this project!
You can do the whole thing under 5 minutes with the help of a leaf stencil.
Just place the stencil on the mug and press on it. Then, apply your favorite glass paint color on the stencil using a paint dauber.
Careful! Don’t wait for the color to dry completely before you remove the stencil from the surface. For the best result, take it off while the paint is still a little damp and reveal a beautifully decorated cup with leaf pattern all over it!
Also Read: Our Dry Clay Decorating Ideas
6. There Are Never Enough Polka Dots In Our Life
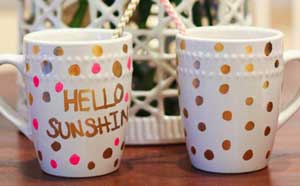
Welcome to the world of Polka Dots, where you can mix and match all the patterns as much as you want and come up with a fabulous outcome in the end!
To make this playful print on your cup, you need to purchase a gold paint pen and a regular pink sharpie from the local craft store.
Draw a big circle on the surface and fill it in with the gold paint pen that you bought. The ink is going to drip a little, so keep that in mind and adjust your designs along the way.
Throw in a few pink dots here and there and your brand-new DIY mug is all set to go to the oven!
Set the temperature at 350 degrees, cook the mugs (ha-ha!) for 30 minutes and let it cool while it’s still inside the oven.
7. Start Your Morning On A Positive Note

Good morning!
Well if it’s a Monday morning, then you aren’t feeling much good I bet!
Nevertheless, we are going to cheer you up with our next idea, which is designed to kick your day off to a good start with some positive messages written on your morning coffee mug!
For this particular craft, you will need a Jupitar Red color sharpie and some cool calligraphy skill (Just practice a bit on a paper and you will get there eventually!).
Choose a mug of your own and we recommend going for a light-colored one to show off the letters more clearly. Then, using the red sharpie, write some positive words that’s sure going to perk you up in the morning.
Let the mug bake in the oven for 30 minutes and start boiling some hot beverage to go along with it in the morning!
8. A Crafter Needs No Artistic Skill!
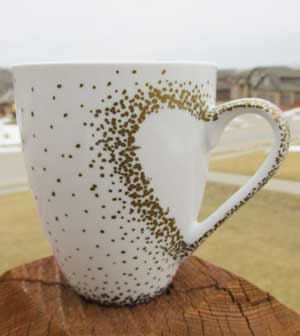
What if your freehand designs aren’t exactly up to the mark and you are afraid of ending up with one ugly mug that no one’s going to love!
Well, dear, I am not going to lie. I am exactly like you!
However, this article is for everyone including clumsy crafters like us!
Our next idea on the list is an easy-peasy project which requires a cup with a heart-shaped handle on the side and an oil-based paint pen of your favorite color.
First, you need to create a heart stencil by tracing the handle on a paper. Then, use the paper to draw an outline on one side of the cup with the help of the paint pen.
Got the outline? Cool!
Now all you have to do is to put dots around the outline as much as you can! To create a whimsical effect, make the dots denser around the outline and slowly fade away the rest.
9. No-Sew Easy Coffee Cozy
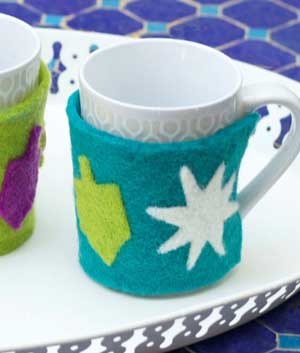
Ever touched a hot coffee cup and regret it instantly?
Me too!
To enjoy a hot beverage while keeping your hands cool, our next idea on the list presents an easy no-sew sleeves for your coffee cups with felt!
Take a felt craft sheet and cut it to a size which allows the sleeves to wrap itself around your coffee mug. Then, mark the place where the sleeves overlap each other and pour some glue in that place to hold them together.
That’s it! Unless you want to accessorize it with some fancy buttons and embellishment?
The best part is that you can deck up these cozies any way you like with little to no skill at all.
Once you get the hang of it, you might even want to make several of these beauties to give them to your friends as holiday gifts!
10. Once A Potterhead, ALWAYS A Potterhead

“After All This Time?”
“Always”.
If you are a die-hard fan of the wizarding world, then you already know what I am talking about!
To make a Harry Potter-themed mug, you will need oil-based sharpie markers, a pencil and white paper.
Want to get on the train to Hogwarts?
Well, you will need to get through the platform 9 ¾ first!
You can download this signature number from the internet and print it on a white paper. Then, shade the back of the paper with a pencil and hold it onto your mug to transfer the image.
All that’s left to do is to trace the image with the sharpie marker and you are done!
You can decorate your glass with other symbols like the iconic glass with a scar on top of it following the same procedure as well.
11. Make Mistakes While You Still Can
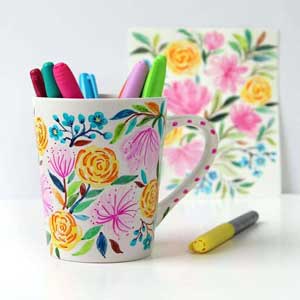
Our next design is much more forgivable than any other ideas on the list!
It all begins with a white ceramic mug as usual. However, you will also be needing a sharpie, brush and sealer for this project.
Start with drawing some colorful flowers on the surface. We recommend using lighter shades for the primary flower shapes and patterns.
Once you start adding some fine details like leaves, stamens and petals, it'd better to outline them with a darker color.
Not liking the shade so far?
No problem!
Just scrub it off with a sponge and keep adjusting your design as you work like this!
Once you are happy with the final look, add a sealing coat on top with the help of a brush and let it dry on its own.
12. Stay Golden Forever
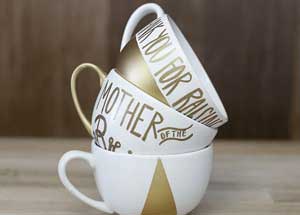
Admit it. Everything looks better in gold as it shines!
For our next idea, we are going to spray-paint our cups with a matte gold color and call it a day!
Simple right?
Well, there's a slight catch in this.
To create some unique patterns on the surface, we recommend wrapping the cup with masking tape in places you don’t want the spray to get on.
Whatever pattern you choose for the outside, you must cover the entire interior with aluminum foil to keep the paint from getting inside.
Then, turn the cup upside down and spray the exposed areas while making sure it doesn’t drip all over the place.
Wait 5 minutes to let it dry, apply a sealer and remove the tape to reveal your fabulous DIY gold-dipped mug ready to use!
13. Make Personalized Mugs For Your Family
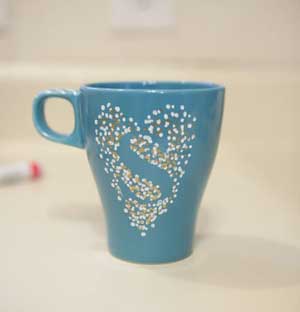
Have a large family where the coffee mugs get interchanged on a daily basis?
Well, that’s one easy problem to deal with it!
You can put an end to this cold war by writing the initial of each family member on their respective coffee mugs!
The easiest way to making your initial stand out on the surface is to find a large scrapbook sticker. Then, take an oil-based color sharpie of your choice and start placing dots all around the sticker. We recommend using two different colors for this purpose.
All done?
Remove the sticker to reveal a beautiful design underneath!
You can opt for many patterns in this way, for instance, you could draw a heart-shaped design around your initial and add some striped details on the handle as well!
Finally, bake the cups in the oven at 350-Degree Celsius and enjoy having a personalized coffee cup that you made all by yourself!
14. A Pretend Mustache Never Fails To Impress

Looking for a gift for your grandpa that’s practical, yet a bit funny at the same time?
Give him a mug with a funny mustache drawn over it!
Mustaches are an indicator of a distinct personality and they are much easier to draw than a cartoon or a funny face. And we all know how much grandpas love their mustaches as it has been a part of manhood since the beginning of time!
Using an oil-based sharpie, draw the outline of the mustache first.
You can download a mustache template online and make a stencil out of a cereal box to help you with the outlining part. Then, fill it in with a Black or Dark-Brown colored sharpie and wipe off any excess ink with a nail polish remover.
Bake it in an oven at 350-Degree Celsius for 30 minutes and enjoy drinking from a cup that has its own mustache on it!
15. Say Hi With A Chalkboard
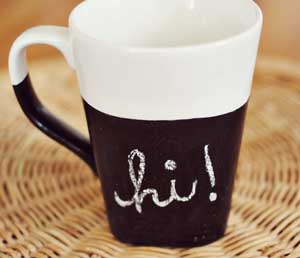
Instead of writing on the surface with a sharpie, we wanted something new, something that will give your entire cup a completely different look!
And boy, you won’t be disappointed for sure!
So, the idea is to create a chalkboard surface on the lower part of your coffee cup.
To do that, you will need a white mug, chalkboard paint and some masking tape.
We will be working with the masking tape first and use it to cover up the top half of the cup including its handle. Next, paint the surface with the chalkboard paint and make sure to leave no unattended spot behind!
Remove the tape at this point and bake it at 350-Degree Celsius for half an hour to make the paint permanent.
Finished baking?
Chalk the painted surface once, wipe it off and now it’s ready for you to write on it!
16. All You Need Is A Painter Tape
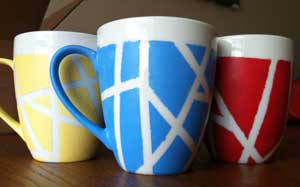
Want to know a secret?
Don’t tell anyone and just keep it between you and me. Agreed?
You can pull off an awesome painting with this technique even you have ZERO artistic skill!
Alright! Now let’s learn how it’s done like a BOSS, shall we?
First, mask the rim of the glass to avoid getting paint in that area. Next, start taping out the parts according to your design or you can choose to do it randomly if you want.
Then, paint over the tape!
We recommend using ceramic paint for this purpose. To get the best result, apply the paint with the help of a brush.
For the final part, bake it at 350-Degree Celsius for 30 minutes and let it cool off in the oven.
One point to be noted, while removing the tape off, make sure the paint is still wet when you do it to avoid getting the color messed up.
17. Abstract Art With Some Brushstrokes
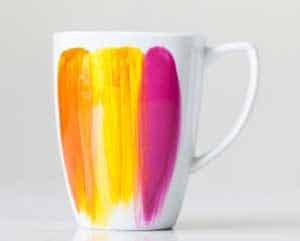
This is another easy-peasy lemon squeezy project for you to try your hands on!
You will need a white mug, porcelain paint and a paintbrush for this purpose.
So, the idea is to create a bold looking brushstroke pattern on the surface. As you will be working with different colors here, it’s best to use different brushes for this purpose.
Dip the paintbrush in your favorite color and go for the first stroke. It's okay to start with a light stroke and gradually work your way upwards. Keep layering the same shade on top until you are satisfied with the look.
Then, move onto the second color and repeat this procedure. You can apply as many colors as you want for this project.
Allow them to dry for 24 hours before you start using these awesome cups for yourself!
18. Looking For Motivations? It’s In Front Of You!

Whether we like to admit or not, we all need a little pick-me-up here and there!
It could be as simple as a friendly conversation, a warm hug or even an inspirational quote to get your dull mood out the window!
So, first, look for your favorite quote online and select a style font that goes well with it.
Then, get a printout copy of that quote, shade the back part of the paper using a pencil and use it as a stencil to draw on the surface of your cup.
Trace the letters using an oil-based sharpie and get the cups into the oven at 425-Degree Fahrenheit and let it bake for 30 minutes.
Pull out the mug once it’s cooled off and enjoy your beverage with a positive energy every morning!
19. Photo Printed Mugs On The Go

Instead of spending money on expensive photo frames, you can capture all those beautiful moments on teacups!
I mean, I am not offering this as an alternative to frames. Rather, it’s a unique idea that will bring a little variation to the otherwise traditional setup that’s found in most households!
To make a photo printed mug, first, you will need the pictures in an appropriate size.
You can either use an Editing app or Photoshop for this purpose. Just open up the application, make any changes as you like, resize it to fit around your cup and finally hit the print button!
We suggest using photo paper for this purpose.
Next, using a foam brush apply a dishwasher-safe Mod Podge to the cup and the backside of a photo to make them stick together. Apply a thin layer on top of the photo and enjoy making these lovely mugs for your friends and family as well!
20. Be The Sarcasm King, Or Queen May I Say?

Life’s tough and it’s going to wear you down sooner or later.
Instead of getting upset or exhausted, I have learned to take anything that life throws at me with a grain of salt and SARCASM!
Yep! It’s my go-to medicine which helps take things not too seriously and if you like the cheat code as well, let’s take a look at the next idea on our list together and get things started right away!
So, the plan is to make a decorate your mug in a way that’s going to look good and make a funny statement as well.
Use a downloaded template from the internet to transfer the design to the mug surface and trace it with colorful sharpies.
For instance, you can draw up some cactuses and make one of them hold a placard saying “Don’t be a prick” (Pun intended!).
Put the cup in an oven for 30 minutes at 350-Degree Celsius to reveal an awesome DIY sarcastic mug of your own!
Tips For Decorating Mugs Perfectly And Effortlessly
Final Words
If you have gone through all of our mug decorating ideas, you will notice one thing for sure.
We have got ideas for everyone!
Whether you are an amateur looking for a new challenge, a crafter with no artistic skill or a pro with everything under your fingertip, you will find inspiration in every nook and corner on this article!
I hope you have enjoyed so far and ready to jump in to try out your favorite ideas from our collection!
Remember there’s no wrong answer in art and the trick is to enjoy yourself while crafting.
Good luck!

